Plunger
Pile Floor System
An inexpensive option to thick
concrete floors.

|
The diagram
below is from the 1972 book "The Owner Built Home", by Ken Kern. In
this discussion Kern describes a lightweight 1" thick fiber reinforced
floor
system that had been tested extensively in India. To read the 2 page
discussion in the book, click the diagram to open the PDF article.
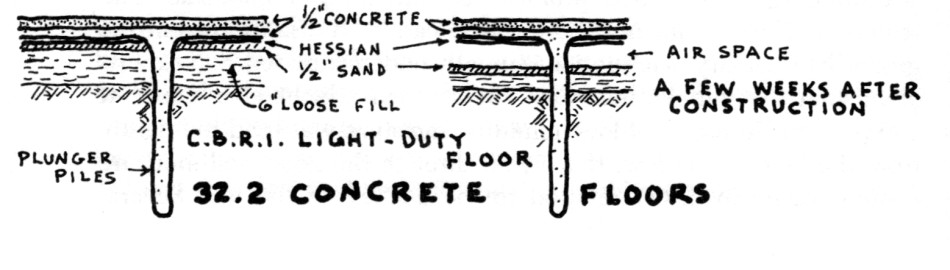 The system
starts with a flat earthen floor surface that has been loosened to
encourage future settlement. Over this soil is laid a thin layer of
sand and then the fiber reinforcing. Traditionally this is hessian, a
type of burlap. CountryPlans administrator Glenn Kangiser has built
floors such as this using jute and landscape fiber mats. The structural
bearing of the floor comes from plunger pile footings punched into the
soil on a 3' by 3' grid with a crowbar or metal rod. These are filled
with grout or concrete which melds with the fiber reinforced concrete shell
above.
After a few weeks the soil below the concrete shell settles and provides a thermal and moisture break from the soil below. Glenn’s notes below Experimentation has been done
by the US military using various fibers for concrete reinforcement.
The jute, Hessian or Burlap takes the place of rebar in
regular concrete. Fibermesh (a modern reinforcement available
at nearly all concrete companies currently about $6.50 per lb.
Normal rate is 1 lb. per cu. yard) if added to the concrete
plaster, makes the mix even more like fiberglass. Engineers
commonly spec Fibermesh added to concrete in place of or along with
steel rebar.
I have successfully used the floor as thin as ½ inch on unstable surfaces with only minor cracking which I had expected to occur (loose dry compacted clay fill around a future pool area where we had a shortage of water). There was no separation of the cracking and cost is so low that another layer could be easily added years later. The piers become bridge pillars and the jute becomes like cables on a suspension bridge supporting the floor span on top of the plunger piers that go down to undisturbed soil. The concrete plaster needs to be damp enough to penetrate the surface of the jute thereby grabbing the fibers and holding them tightly so I make the plaster a bit wetter than normal as the thin plaster loses its moisture quickly to the jute. Wetting the prepared jute on the floor will soften it and allow good adhesion. A light spray of water to dampen jute and earth surface is sufficient. Thousands of jute and Fibermesh fibers per square yard of floor area provide a nearly impenetrable surface under normal use after it has cured properly. Even point loads such as heavy wood stove legs are easily supported in about a week or less. For a clue of the strength, see if you can break even one of the jute ropes in the netting pulling on it by hand then figure out how strong it is when multiplied by hundreds cemented together in short lengths. Experimentation has been done by the US military using various fibers for concrete reinforcement. The jute, Hessian or Burlap takes the place of rebar in regular concrete. Fibermesh (a modern reinforcement available at nearly all concrete companies currently about $6.50 per lb. Normal rate is 1 lb. per cu. yard) if added to the plaster makes the mix even more like fiberglass. Engineers commonly spec Fibermesh added to concrete in place of or along with steel rebar. I have successfully used the floor as thin as ½ inch on unstable surfaces with only minor cracking which I had expected to occur (loose dry compacted clay fill around a future pool area where we had a shortage of water). There was no separation of the cracking and cost is so low that another layer could be easily added years later. The piers become bridge pillars and the jute becomes like cables on a suspension bridge supporting the floor span on top of the plunger piers that go down to undisturbed soil. The concrete plaster needs to be damp enough to penetrate the surface of the jute thereby grabbing the fibers and holding them tightly so I make the plaster a bit wetter than normal as the thin plaster loses its moisture quickly to the jute. Wetting the prepared jute on the floor will soften it and allow good adhesion. A light spray of water to dampen jute and earth surface is sufficient. Thousands of jute and Fibermesh fibers per square yard of floor area provide a nearly impenetrable surface under normal use after it has cured properly. Even point loads such as heavy wood stove legs are easily supported in about a week or less. For a clue of the strength, see if you can break even one of the jute ropes in the netting pulling on it by hand then figure out how strong it is when multiplied by hundreds cemented together in short lengths. I asked Glenn: How about cold soil climates? A dead airspace is not much insulation. Could the plunger piers be punched through a couple of inches of foam insulation? Or perhaps the same floor system built right on top of the foam could perform as well without the piers? I have successfully used the
non-pier version of this floor around a pool that was exposed to the
weather throughout the winter with only minimal spalling from water
freezing under the surface. In a dry area I would expect no
spalling or other problems and I believe this floor would perform well
on top of foam either with or without the plunger piers. I
will plan on setting up a test section and experimenting with this and
then reporting back on my findings.
Spalling should be eliminated if an admix such as Moxie or a sealer such as Thoroseal is used and water is prevented from getting under the surface of the plaster where it can freeze and spall the surface. Not even rock is safe from freezing water, so I expect some spalling if water is allowed into the plaster before freezing conditions. My experience at our pool indicates that damage is minimal most of the time and our patio floor there is still in decent shape after three years of exposure to all winter weather, rain, snow and freezing. Repairs are easily made so minor damage is of little concern. We did nothing to protect the floor there - no admix or sealers. We currently have a friend who is going to do this modification to the mix and I will report back on it after it is in use for a season or two. Glenn has consolidated information on his experiments using this floor system without piers such as the pool installation above. Click HERE to open this report. Here are some images of this floor being used in Glenn's underground home. 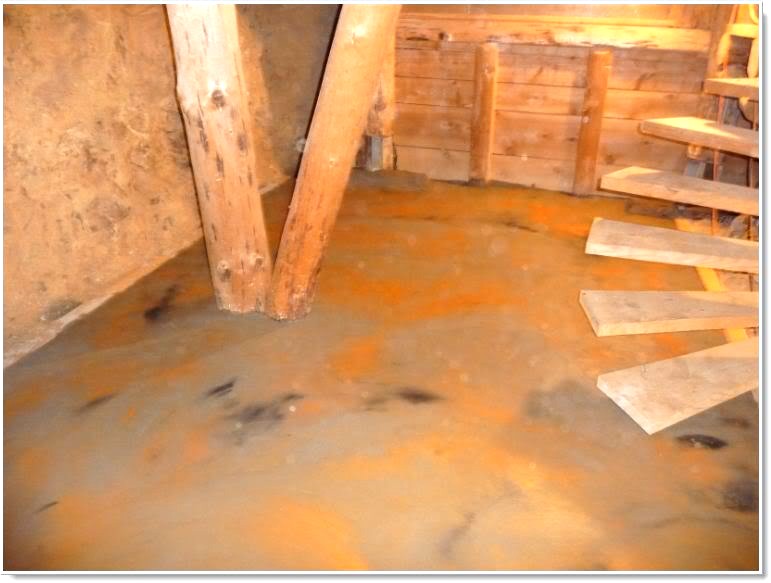 Here are Glenn's details of the floor installation. The areas in the pictures (above and below) have plunger piers to the extent that the
depth of the loose fill goes. The floors were carved out of claystone
and rock with a backhoe and jackhammer then the elevation was set with a laser
and 4 foot level on a screed board. Fill was added to the low spots as
needed and high spots were chipped off with the jackhammer or a pick and
shovel.
I divided the sections with permanent screed boards, keeping them in place with 60d nails driven directly into the claystone. Because of the dense soil I used a bar and pounded out shallow holes for the plunger piers on about a 2'x2' grid. I wanted to keep the sections in sizes that were manageable and could be reasonably worked without killing myself. Since I'm often working alone, I prefer to do 1 or 2 8'x8' sections at a time rather than trying to do a whole floor at once. I put piers about every 8 inches around the screed edges due to the shallow depth and lack of deep piers. This adds strength around the edges, but may be more than are necessary. The screed boards could be removed for subsequent slabs if desired. I would suggest placing a drop cloth over the finished sections for protection if the next section is being done at a later date. In this case plunger pier lengths varied from 0" to about 8" maximum. I have not found any problems with these different lengths but the earth underneath may not settle as much thus reducing the insulating air space. I had one small crack in the bathroom floor where the concrete transitioned from a hard bedrock base to the fill area, but the reinforcing did not allow separation so there were no usability issues. The color is only on the top of the top layer of concrete ... the second layer that I generally plaster on the second day. A longer wood float helps to make for a flatter floor, so I put the concrete on from a 5 gallon bucket and smooth it out first with a wood float and no color. After an area as big as I can reach across leaning on a trowel with my left hand is done, I add splotches of coloring from either a color powder bag or a liquid color bottle. For a more natural and interesting look it is important to not over-trowel the color. Have the floor level and troweled with a steel swimming pool trowel before placing the color splotches. Trowel enough to smooth the floor to the desired finished smoothness because it is possible you may not want to come back and re-trowel it. If retroweling or harder troweling is desired, it will be necessary to wait a while and do it adding water from a spray bottle or hose sprayer as needed. Continue to trowel until the surface is once again smooth and dry. Do not add too much water or it will be hard to get a decent finish. Generally more rounds of troweling as the concrete gets harder will give you a harder, smoother, more easily cleaned finish. Stop re-troweling when you are satisfied - anywhere from fairly soft but smooth on up to hard troweled. Sometimes it's your back that tells you when to quit. Metal finishing sliders under your toes and knees will prevent damage to the finished area as you work your way backward re-troweling. Absent metal sliders, you could make some out of smooth plywood, Masonite or similar though they may not work as well. The idea of the slider is to keep from making more re-troweling work for yourself as you are out on the uncured floor surface. Excess troweling and addition of water on the surface will lead to an uninteresting monotone color that could just have well been done by adding color to the entire batch of cement. Note that the color as described above goes deeper than the surface so it will not scratch off. After the floor has cured and dried for a couple weeks, you may want to seal the surface with Polyurethane. This will give a easily cleaned finish that will keep spills from permanently staining the floor. I generally use a glossy finish. The floor will kill a bit of the gloss on its own and satin and low gloss finishes are not as hard and will not hold up as well. When doing these smaller sections I have found that mixing the sand, cement and Fibermesh is most easily done in a 5 gallon bucket with a 1/2 inch drill powering a drywall mixer. This is a shaft about 2 feet long with a mixer blade on the bottom about 8 inches across. One could also be made from a piece of rebar or other rod, bending the mixer section as needed on the bottom. A cement mixer is too much trouble to clean every time you make another batch, so a good drill powered mixer is my weapon of choice.  Here is the latest forum thread on this floor system: Plunger Pile Floor System Here are a couple of earlier threads where the floor system was discussed. John Raabe
and Glenn Kangiser for CountryPlans.com
|