I have included a refresher picture in case you are new to or are a little rusty with stair terminology. This lesson was not meant to show you how to create stairs in 3DHA, but rather to get a better understanding how different values in the Stair dialog box effect other values. Before reading this lesson you should have read the 3DHA manual in order to learn how to create stairs.
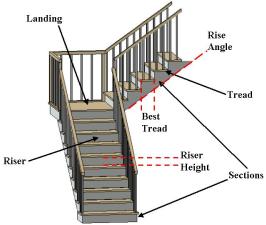
Treads are the planks that you step on as you walk up or down the stairs. The Riser is the vertical wall between each tread. The Riser Height is the distance between two successive treads. Sections are groups of Treads and Risers, separated by Landings. Landings are areas larger than the treads that separate different Sections. They are used whenever the stairway changes direction, but can be used even if the stairway continues in the same direction. The Rise Angle is the angle the Stair Section rises in relation to horizontal. Best Tread is the Best Tread width, in relation to the Riser Height, for climbing.
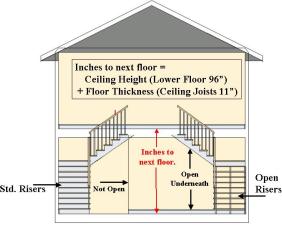
This next picture helps you understand more values in the Stairs dialog box. Inches to next floor is derived by adding the Ceiling Height of the room where the stairs start to the Floor Thickness of the room above the stairway. Open Riser indicates that no solid pieces are placed between treads. If the treads are shorter than normal, this may allow for more room for a person's foot while climbing the stairs or can be used to see underneath. Open Underneath tells 3DHA not to build walls under the stairs.
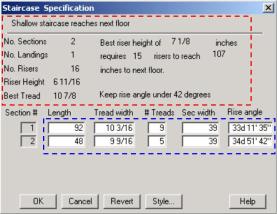
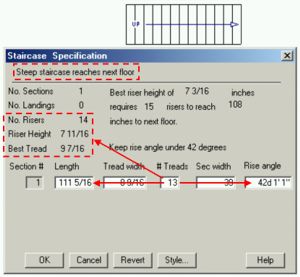
When you double click a stair section this dialog box appears. In this case we are viewing a stairway with 2 sections, separated by a landing. The upper section shown by the dotted red line is basically an informative section, where the lower section shown by the dotted blue line is where you can set the values for your stairs.
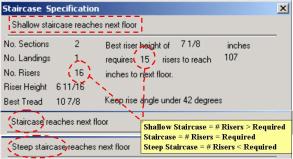
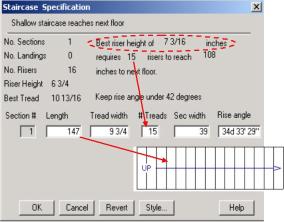
The very first thing you see at the top of the informative sections is whether or not the staircase reaches the next floor. Also, it tells you whether the staircase is Shallow, Normal, or Steep. If you have more Risers than required to reach the next floor, then the staircase is Shallow, as shown in the picture by the No. Risers being 16 and the requires __ risers being 15. The right number of risers make the staircase Normal, and too few risers make the staircase Steep.
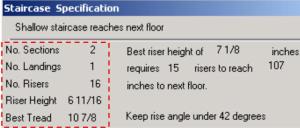
The section inside the dotted red box shows you the current settings of your entire staircase (all sections and landings).
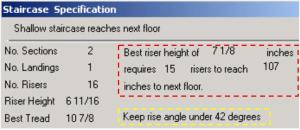
The next picture has two dotted line boxes. The red box is the section where 3DHA shows you the best settings to build a stairway that is comfortable for humans to use. The yellow box never changes as this is the maximum angle that is comfortable for humans (and generally legal under code). But you can go beyond what is recommended if you need to fit your stairway into a tight spot (in 3DHA). Just understand that your friends, relatives, and local building code representatives may not be happy with the stairs you build.
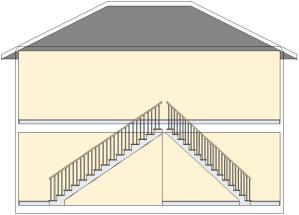
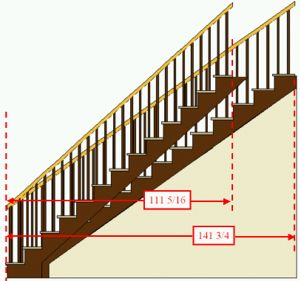
These two stairways have their dialog boxes shown below. The one on the left is obviously longer, making the Rise Angle lower than the one on the right. It would be much more comfortable to climb these stairs than the ones on the right. Also, the stairs on the right are Open Underneath, exposing the baseboards on the wall behind the stairs. This was done to show the difference when the Open Underneath checkbox is checked.
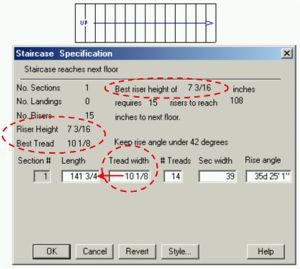
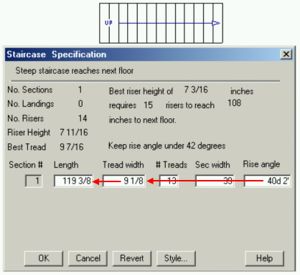
Both sets of stairs are climbing to the same second floor, creating the need for the same 15 risers required to reach the next floor at 108 inches. Because the number of risers and the Inches to Next Floor are the same, the Best Riser Height is the same for both stairs. Notice how the Length of the stairs causes the Tread Width to be adjusted differently. The longer the stair section, the wider the treads. The Stair Specification dialog box to the right shows a Rise Angle to be over 42 degrees. This one is 42 degrees, 42 minutes, 34 seconds. Which is over the suggested angle for good stair construction by 42 minutes and 34 seconds (polar coordinates).
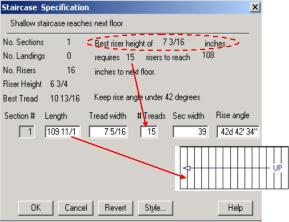
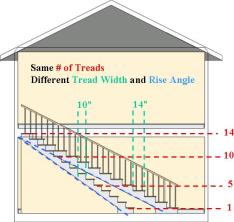
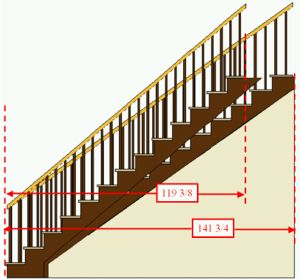
Even though the riser height and the number of risers are the same as the example above, this dialog box shows a rise angle within the limits of what would be comfortable for humans. This is caused by the length. The shorter length is usually caused by the need to fit the stairway into a smaller area than that which would be preferred. The next picture shows two sets of stairs side by side and how the rise angle changes with the tread width.
Even though both stairs have the same number of treads, as shown by the red dotted lines and numbers, their rise angles are different due to the difference in the width of their treads. The stair with a 10" tread width is much steeper than the stair with the 14" stair width. In this case I created a second stair section with a tread width that would be greater (14") than normal, causing that section to have a very low, comfortable angle.
Standard Staircase
The dialog box to the left shows the values for a standard staircase. This is evident by the verbiage at the top that does not include Shallow or Steep. (NOTE: the following examples show 108 inches to the next floor. Normally it would be 107. (96 + 11) This is because these stairs were built without a building.) The best riser height is derived by: Inches to Next Floor divided by the No. Risers or (108 / 15). The Tread width comes from: Length divided by the # Treads or (141-3/4 / 14).
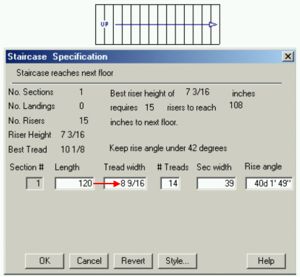
What happens when you change the value found in the Length text box? The Tread Width will change. If you make the staircase longer or shorter, the distance must be made up by changing the width of each tread. In this case we change the length from 141-3/4 inches to 120 inches. (141-3/4 - 120 = 21-3/4) This caused the Tread Width to go from 10-1/8 inches to 8-9/16 inches. The difference in each tread width comes from the difference in length divided by the # treads or (21-3/4 / 14) or 1-9/16. (10-1/8 - 8-9/16 = 1-9/16) The # Treads stays the same when you change the length, but the Rise Angle changes due to the shorter stairs.
Steep Staircase
When you change the value for the Number of Treads, many values change. In this case we changed this value from 14 to 13, creating a Steep Staircase. The picture to the left shows the other values that change to match. The length changes because there is one fewer tread to make up the stair section. One fewer Tread means one fewer risers, changing the No. Risers and causing Riser Height to change in order to reach the next floor. When the Riser Height changes the Best Tread value changes to show the best Tread Width for the Riser Height. But the actual Tread Width does NOT change automatically. When the Length changes but the distance to next floor does not, then the Rise Angle will change.
This picture shows the difference between the Standard and Steep staircases above. The Steep staircase is the one in front, shown as Open Underneath. Notice how much shorter this staircase is, allowing it to be placed in a much tighter area. But it can also be tougher to climb on a daily basis. Standard code stairways have a maximum of 8" for the riser and a minimum of 9" for the tread. They should also be 36" or more wide
If you change the Rise Angle, that will change the Tread Width, which will in turn, changes the Length of the stair section. Here, we wanted to lower the rise angle under the legal limit and make it more comfortable for us. We are willing to make any changes in our plan necessary to accommodate the additional length it produces.
This picture shows what that change will do to the Steep Staircase in relation to the Standard Staircase. You don't save as much room, but you get a staircase that falls within building codes and one that people will not mind using. You can see that the Staircase Specification dialog box allows you to customize your stairs to suit your needs. (within the reality of geometry)
Alternative Stairways
When it comes to custom Stairways, 3DHA is rather limited. The Alternating Tread staircase (also called the Jefferson stair as it was invented by Thomas Jefferson) is shown here. It is an example of one that 3DHA will not produce. However, this type of stairway can be used as an alternative to a ladder or very steep stair. Building codes generally restrict the use of steep stairs to lofts and upper floor areas under 200 sf in size. Areas under this size limit can have any type of stair. (Check with your local codes for more information.)
Another alternative stair is the spiral stair. For code level access to an upper floor, spirals are usually required to be 5' or more in diameter. You can find this stair under "Fixture Library, Utility, Circular Stairs". There are 48" and 54" diameter stairs shown which could be used for lofts. Resized to 60" diameter your code may allow this as a primary stair.
The stair at the left was found at: http://www.akastairs.com/ALTERNATING_TREAD.HTML
Ladder Stairs
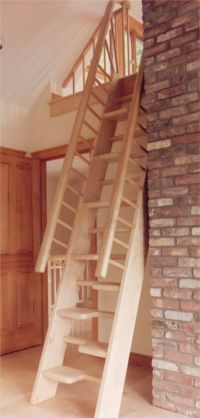
You can build a ladder or steep staircase in 3DHA. The staircase at right is Open Underneath, and incorporates Open Risers so the users foot can comfortably go beyond the width of the treads as they walk up the stairway.
To build such a stair you can use 2x6 treads wrapped in carpet. There would be only two support horses (from 2x12's) and the stair would be 30" wide with hand rails on both sides if possible. This is similar to a submarine stair and younger folks coming down will ride the handrails. Such a stair is difficult to get furniture up and dangerous for the old and frail, especially if the treads are polished wood. For lofts only, a usable stair can be squeezed into only a few feet of length. (5' long would be twice as steep as a standard stair, while 30" long would be 4x steeper - a true ladder stair.)
